Contoh CheckBox Kustom Android
September 09, 2020
Add Comment
Android menyediakan fasilitas untuk menyesuaikan UI elemen tampilan daripada default.
Anda dapat membuat CheckBox kustom di android. Jadi, Anda dapat menambahkan beberapa gambar kotak centang yang berbeda pada tata letak.
Sekarang menerapkan selector dalam file lain (checkbox.xml) di bawah folder drawable yang akan menyesuaikan kotak centang.
# Contoh Kotak Centang (CheckBox) Kustom
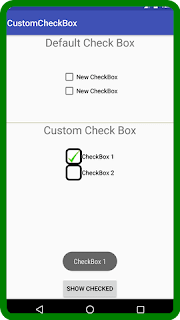
Dalam contoh ini, kita membuat kotak centang default maupun kustom. Tambahkan kode berikut dalam activity_main.xml.* activity_main.xml
File : activity_main.xml<?xml version="1.0" encoding="utf-8"?> <RelativeLayout xmlns:android="http://schemas.android.com/apk/res/android" xmlns:app="http://schemas.android.com/apk/res-auto" xmlns:tools="http://schemas.android.com/tools" android:layout_width="match_parent" android:layout_height="match_parent" tools:context="example.android.com.customcheckbox.MainActivity"> <TextView android:id="@+id/textView1" android:layout_width="fill_parent" android:layout_height="wrap_content" android:gravity="center_horizontal" android:textSize="25dp" android:text="Default Check Box" android:layout_alignParentTop="true" android:layout_alignParentLeft="true" android:layout_alignParentStart="true" /> <CheckBox android:layout_width="wrap_content" android:layout_height="wrap_content" android:text="New CheckBox" android:id="@+id/checkBox" android:layout_below="@+id/textView1" android:layout_centerHorizontal="true" android:layout_marginTop="46dp" /> <CheckBox android:layout_width="wrap_content" android:layout_height="wrap_content" android:text="New CheckBox" android:id="@+id/checkBox2" android:layout_below="@+id/checkBox" android:layout_alignLeft="@+id/checkBox" android:layout_alignStart="@+id/checkBox" /> <View android:layout_width="fill_parent" android:layout_height="1dp" android:layout_marginTop="200dp" android:background="#B8B894" android:id="@+id/viewStub" /> <CheckBox android:layout_width="wrap_content" android:layout_height="wrap_content" android:text="CheckBox 1" android:id="@+id/checkBox3" android:button="@drawable/customcheckbox" android:layout_below="@+id/viewStub" android:layout_centerHorizontal="true" android:layout_marginTop="58dp" /> <CheckBox android:layout_width="wrap_content" android:layout_height="wrap_content" android:text="CheckBox 2" android:id="@+id/checkBox4" android:button="@drawable/customcheckbox" android:layout_below="@+id/checkBox3" android:layout_alignLeft="@+id/checkBox3" android:layout_alignStart="@+id/checkBox3" /> <TextView android:layout_width="wrap_content" android:layout_height="wrap_content" android:textAppearance="?android:attr/textAppearanceSmall" android:textSize="25dp" android:text="Custom Check Box" android:id="@+id/textView" android:layout_alignTop="@+id/viewStub" android:layout_centerHorizontal="true" /> <Button android:layout_width="wrap_content" android:layout_height="wrap_content" android:text="Show Checked" android:id="@+id/button" android:layout_alignParentBottom="true" android:layout_centerHorizontal="true" /> </RelativeLayout>
Sekarang menerapkan selector dalam file lain (checkbox.xml) di bawah folder drawable yang akan menyesuaikan kotak centang.
* checkbox.xml
File : checkbox.xml<?xml version="1.0" encoding="utf-8"?> <selector xmlns:android="http://schemas.android.com/apk/res/android"> <item android:state_checked="true" android:drawable="@drawable/checked" /> <item android:state_checked="false" android:drawable="@drawable/unchecked"/> </selector>
* Activity class
File : MainActivity.javapackage example.android.com.customcheckbox; import android.support.v7.app.AppCompatActivity; import android.os.Bundle; import android.view.View; import android.widget.Button; import android.widget.CheckBox; import android.widget.Toast; public class MainActivity extends AppCompatActivity { CheckBox cb1,cb2; Button button; @Override protected void onCreate(Bundle savedInstanceState) { super.onCreate(savedInstanceState); setContentView(R.layout.activity_main); cb1=(CheckBox)findViewById(R.id.checkBox3); cb2=(CheckBox)findViewById(R.id.checkBox4); button=(Button)findViewById(R.id.button); button.setOnClickListener(new View.OnClickListener() { @Override public void onClick(View v) { StringBuilder sb=new StringBuilder(""); if(cb1.isChecked()){ String s1=cb1.getText().toString(); sb.append(s1); } if(cb2.isChecked()){ String s2=cb2.getText().toString(); sb.append("\n"+s2); } if(sb!=null && !sb.toString().equals("")){ Toast.makeText(getApplicationContext(), sb, Toast.LENGTH_LONG).show(); } else{ Toast.makeText(getApplicationContext(),"Nothing Selected", Toast.LENGTH_LONG).show(); } } }); } }
Output :

0 Response to "Contoh CheckBox Kustom Android"
Posting Komentar