Contoh Tautan Link Android
September 12, 2020
Add Comment
Kelas Linkify digunakan untuk membuat link dari TextView atau Spannable. Ini mengkonversi teks dan ekspresi reguler ke link yang dapat diklik berdasarkan kecocokan pola nilai teks dan regex. Kelas Linkify membuat link untuk URL web, alamat email, nomor telepon, dan alamat peta dengan menggunakan pola.
Tautan android yang dapat diklik dapat dibuat dengan dua cara berbeda :
1. Menggunakan file layout (.xml) : menggunakan atribut autoLink dengan jenis yang ditentukan.
2. Menggunakan kelas Java: menggunakan metode addlLinks() dengan jenis kelas Linkify tertentu.
Buat file myList.xml layout kustom dan tambahkan kode berikut. Dalam layout ini, kita menggunakan atribut autoLink dengan web, email, dan properti telepon. File : myList.xml
Membuat kelas adaptor MyListActivity.java dan memperluas ArrayAdapter dengan kode berikut. File : MyListActivity.java
Terakhir, di kelas MainActivity.java, atur instance adaptor ke ListView. File :MianActivity.java
<TextView
     android:id="@+id/url"
            android:autoLink="web"/>
2. Menggunakan kelas Java: menggunakan metode addlLinks() dengan jenis kelas Linkify tertentu.
TextView webURL = new TextView(this);
webURL.setText("https://www.yoururl1.com/");
Linkify.addLinks(webURL , Linkify.WEB_URLS);
Contoh Link Tautan Android
Dalam contoh ini, kami akan membuat tautan untuk URL web, alamat email, dan nomor telepon. Buat file activity_main.xml di direktori layout dan tambahkan kode berikut. File : activity_main.xml<?xml version="1.0" encoding="utf-8"?> <RelativeLayout xmlns:android="http://schemas.android.com/apk/res/android" xmlns:app="http://schemas.android.com/apk/res-auto" xmlns:tools="http://schemas.android.com/tools" android:layout_width="match_parent" android:layout_height="match_parent" tools:context="example.android.com.androidlinkify.MainActivity"> <ListView android:id="@+id/list" android:layout_width="match_parent" android:layout_height="wrap_content" android:layout_marginBottom="50dp"> </ListView> </RelativeLayout>
Buat file myList.xml layout kustom dan tambahkan kode berikut. Dalam layout ini, kita menggunakan atribut autoLink dengan web, email, dan properti telepon. File : myList.xml
<?xml version="1.0" encoding="utf-8"?>
<LinearLayout xmlns:android="http://schemas.android.com/apk/res/android"
    android:layout_width="match_parent"
    android:layout_height="match_parent"
    android:orientation="horizontal" >

    <ImageView
        android:id="@+id/icon"
        android:layout_width="60dp"
        android:layout_height="60dp"
        android:padding="5dp" />

    <LinearLayout android:layout_width="wrap_content"
        android:layout_height="wrap_content"
        android:orientation="vertical">

        <TextView
            android:id="@+id/url"
            android:layout_width="wrap_content"
            android:layout_height="wrap_content"
            android:text="Medium Text"
            android:autoLink="web"
            android:textStyle="bold"
            android:textAppearance="?android:attr/textAppearanceMedium"
            android:layout_marginLeft="10dp"
            android:layout_marginTop="5dp"
            android:padding="2dp"
            android:textColor="#4d4d4d" />
        <TextView
            android:id="@+id/email"
            android:layout_width="wrap_content"
            android:layout_height="wrap_content"
            android:text="TextView"
            android:autoLink="email"
            android:layout_marginLeft="10dp"/>
        <TextView
            android:id="@+id/phonenumber"
            android:layout_width="wrap_content"
            android:layout_height="wrap_content"
            android:text="TextView"
            android:autoLink="phone"
            android:layout_marginLeft="10dp"/>
    </LinearLayout>
</LinearLayout>
Membuat kelas adaptor MyListActivity.java dan memperluas ArrayAdapter dengan kode berikut. File : MyListActivity.java
package example.android.com.androidlinkify;

import android.app.Activity;
import android.text.util.Linkify;
import android.view.LayoutInflater;
import android.view.View;
import android.view.ViewGroup;
import android.widget.ArrayAdapter;
import android.widget.ImageView;
import android.widget.TextView;

public class MyListAdapter extends ArrayAdapter<String> {

    private final Activity context;
    private final String[] url;
    private final String[] email;
    private final String[] phonenumber;
    private final Integer[] imgid;

    public MyListAdapter(Activity context, String[] url,String[] email,String[] phonenumber, Integer[] imgid) {
        super(context, R.layout.mylist, url);
        // TODO Auto-generated constructor stub
        this.context=context;
        this.url=url;
        this.email=email;
        this.phonenumber=phonenumber;
        this.imgid=imgid;

    }

    public View getView(int position, View view, ViewGroup parent) {
        LayoutInflater inflater=context.getLayoutInflater();
        View rowView=inflater.inflate(R.layout.mylist, null,true);

        TextView titleText = (TextView) rowView.findViewById(R.id.url);
        TextView subtitleText = (TextView) rowView.findViewById(R.id.email);
        TextView phonenumberText = (TextView) rowView.findViewById(R.id.phonenumber);
        ImageView imageView = (ImageView) rowView.findViewById(R.id.icon);
        imageView.setImageResource(imgid[position]);

        titleText.setText(url[position]);
        subtitleText.setText(email[position]);
        phonenumberText.setText(phonenumber[position]);
        Linkify.addLinks(phonenumberText,Linkify.PHONE_NUMBERS);

        return rowView;
    };

}
Terakhir, di kelas MainActivity.java, atur instance adaptor ke ListView. File :MianActivity.java
package example.android.com.androidlinkify;

import android.support.v7.app.AppCompatActivity;
import android.os.Bundle;
import android.widget.ListView;

public class MainActivity extends AppCompatActivity {
    ListView list;

    String[] urls ={
            "https://www.yoururl1.com/","https://www.yoururl2.com/",
            "https://www.yoururl3.com/","https://www.yoururl4.com/",
            "https://www.yoururl5.com/","https://www.yoururl6.com/",
            "https://www.yoururl7.com/","https://www.yoururl8.com/",
            "https://www.yoururl9.com/","https://www.yoururl19.com/",
    };

    String[] emails ={
            "email_1@mail.com","email_2@mail.com",
            "email_3@mail.com","email_4@gmail.com",
            "email_5@mail.com","email_6@mail.com",
            "email_7@mail.com","email_8@mail.com",
            "email_9@gmail.com","email_10@mail.com"
    };

    String[] phoneNumber ={
            "+(1234)-567","+(1234)-567",
            "7563654321","9475000000","8575000000",
            "+1 (919) 555-1212","+91 (919) 555-1212",
            "6463654321","5475000000","8575000000",
    };

    Integer[] imgid={
            R.drawable.image_1,R.drawable.image_2,
            R.drawable.image_3,R.drawable.image_4,
            R.drawable.image_5, R.drawable.image_6,
            R.drawable.image_7,R.drawable.image_8,
            R.drawable.image_9,R.drawable.image_10,
    };
    @Override
    protected void onCreate(Bundle savedInstanceState) {
        super.onCreate(savedInstanceState);
        setContentView(R.layout.activity_main);

        MyListAdapter adapter=new MyListAdapter(this, urls, emails,phoneNumber,imgid);
        list= findViewById(R.id.list);
        list.setAdapter(adapter);
    }
}
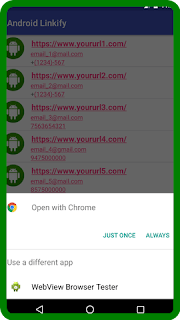
Output :

0 Response to "Contoh Tautan Link Android"
Posting Komentar